


FAQ
Level A
1. Unpack the delivered zip file in a desired directory on the internal or external hard disk (e.g. in the directory c:ccdguide or d:ccdguide). The complete software is now installed and only the images are missing.
2a. With the USB stick version, the images are supplied on the USB stick and can simply be copied into the CCD-Guide directory.
2b. With the download version, the images can simply be downloaded with the help of the CCD-Guide Browser (see FAQ A02).
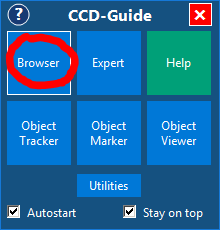
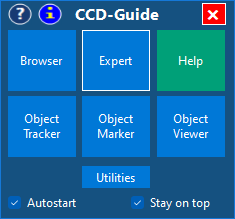
1. Start CCD_Guide.exe and then click on the Browser button to start the CCD-Guide Browser.
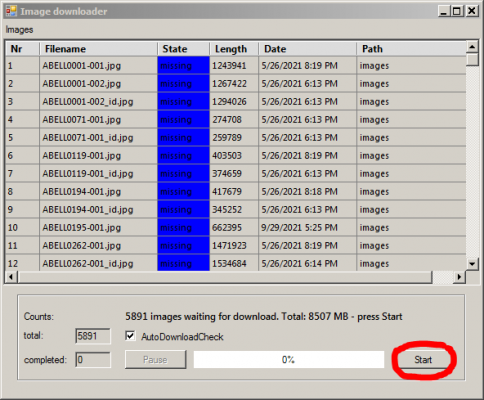
2. At the same time as the Browser window appears, the Image downloader window opens automatically as soon as no images are available or images are still missing. Pressing the Start button in the Image downloader starts the download of the images. The download can run in the background, be paused and restarted at any time. The Image downloader window can also be started via the menu “File” -> “Start image downloader”.
1. Installing the software and downloading the images as in the FAQs A01 and A02 explained.
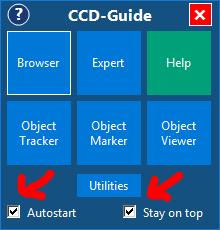
2. Start CCD_Guide.exe. Set the “Autostart” checkbox so that CCD-Guide is started automatically when the computer is booted. Set the “Stay on top” checkbox so that the CCD-Guide window always remains in the foreground. Move the CCD-Guide window to a desired position on the screen (second monitor also possible). The window position is stored.
3. Press the Help button. Here you will find, among other things, the detailed user manual.
4. Click on the browser button and get to know the functions of the browser (see FAQs A04, A05 and A06).
1. Click on the Browser button in the CCD_Guide.exe to open the CCD-Guide Browser.
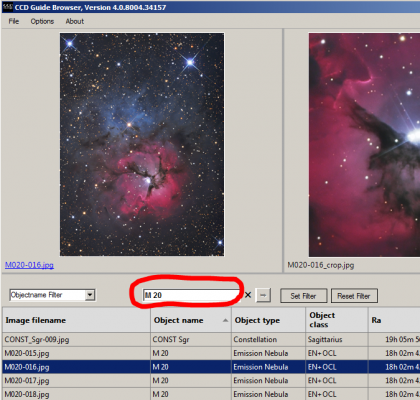
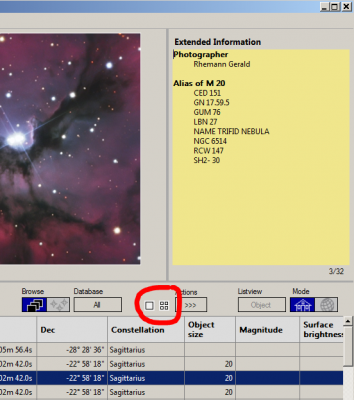
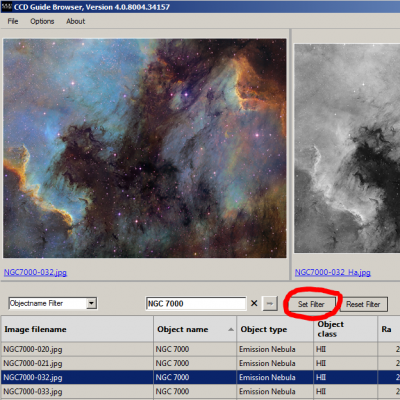
2. Enter the object you are looking for in the white input field to the right of the Objectname Filter (e.g. M 20, NGC 7000, …) and then press the Enter key. Only the image data rows of the searched object are displayed in the table. For the active image data row (highlighted in blue), the images and the additional information are displayed above the table. Double-click on an image to view it in detail. By using the arrow keys of the keyboard you can quickly scroll through the image data rows of the table.
3. If a large number of image data rows are visible in the table, it is recommended to use the SlideShow or the Preview panel. To start the SlideShow, click on the button with the white square. To start the Preview panel, click on the button with the four small white squares.
1. Click on the Browser button in the CCD_Guide.exe to open the CCD-Guide Browser.
2. Press the “Set Filter” button to open the Set Filter window.
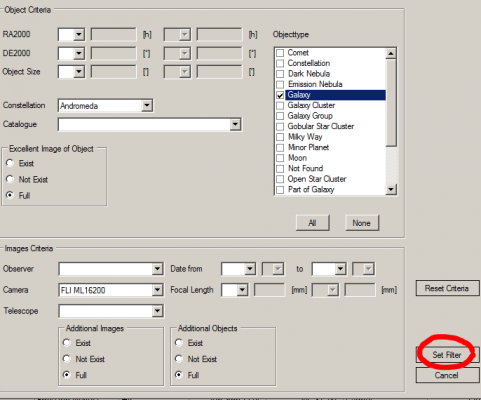
3. In the Set Filter window, a number of different criteria such as constellation, object type, camera or telescope can be set and combined as desired. As soon as you click the “Set Filter” button in the Set Filter window, the set criteria are active and only those image data rows are displayed in the table of the Browser that fulfil the criteria. With the button “Reset Filter” all active filters are removed and all existing data rows are displayed.
4. For the active image data row (highlighted in blue), the images and the additional information are displayed above the table. Double-click on an image to view it in detail. By using the arrow keys of the keyboard you can quickly scroll through the image data rows of the table. If a large number of image data rows are visible in the table, it is recommended to use the SlideShow or the Preview panel. To start the SlideShow, click on the button with the white square. To start the Preview panel, click on the button with the four small white squares.
1. Click on the Browser button in the CCD_Guide.exe to open the CCD-Guide Browser.
2. Reduce the number of displayed image records to a manageable number by using filters such as the Object Name Filter or the Set Filter (see FAQs A04 and A05).

3. Once you have found an interesting image, you can open and analyse it by double-clicking on it. In the Browser, the image name is displayed on the left below each preview image. If this image name is displayed as a blue link, then this image can be opened in the ObjectMarker via this link.

4. If you click on the View button in the ObjectMarker, the image is labelled with the object names of the CCD-Guide database. FAQ B05 describes how to change the behavior of the object label.

1. Search for suitable constellations or alternatively determine a suitable right ascension and declination range. (e.g. by using a rotatable star chart).
2. Click on the Browser button in the CCD_Guide.exe to open the CCD-Guide Browser.
3. Press the “Set Filter” button to open the Set Filter window.

4. In the Set Filter window, select a specific constellation (e.g. Vela) in the Constellation drop-down box and then press the Set Filter button. Alternatively, the RA/DE range can be set in the Set Filter window (e.g. RA > 8h and RA < 12h and DE < 0°).

5. View the filtered images in the Browser and choose personal object targets.

1. Click on the ObjectTracker button in the CCD_Guide.exe to open the ObjectTracker.
![]()
2. Select an existing location in the ObjectTracker. If the location does not exist yet, then create the location first with Edit Location (see FAQ A09).
![]()
3. Enter the object in the Name field and press the Enter key.
![]()
4. Change the constraints if necessary:
- Object Altitude Limit = 40° (minimum height of the object)
- Moon Distance Limit = 20° (minimum distance of the object from the moon)
- Moon Illumination Limit = 30% (Maximum moon illumination allowed when the moon is above the horizon)
- Sun Altitude Limit = -18° (Minimum depth of the sun below the horizon)
5. In the graph, the altitude of the object tonight is shown with a red line. Two triangles indicate the visibility window. The visibility window is also output in tabular form in the “Object Time Window” area.
![]()
1. Click the “Edit” button in the ObjectTracker to open the Location Editor window.
![]()
2. In the Location Editor window, click on the “New” button.
![]()
3. Enter a descriptive name for the location. Then enter the latitude, longitude and altitude. Finally, select the time zone.
![]()
4. Optionally enter a horizon (see FAQ B01).
5. Click the “Save” button and then close the window.
6. After that, the new location is available in the ObjectTracker.
Tips in this pdf-Dokument.
- start CCD_Guide.exe.
- If an “i” symbol is visible in the blue CCD_Guide window at the top, then an update is available. In this case call the function Update under Utilities and press the button Update. -> Done

Level B
1. Click on the button “Edit” in the ObjectTracker to open the location editor window.
![]()
2. Select the desired location line in the location editor window. > If the location does not exist yet, create the location first (see FAQ A09).
3. Click on the “Enable horizon edit” checkbox.
![]()
4. The horizon is displayed graphically. South is in the middle of the graphic. Use the left mouse button to paint the horizon.
![]()
5. Click button “Save” and then close the window.
6. Afterwards the horizon is available for the location in the ObjectTracker. It can be activated by setting the checkbox “Horizon Limit”.
![]()
1. Click on the ObjectMarker button in the CCD_Guide.exe to open the ObjectMarker.

2. Open Options and switch to the Astrometry tab. Then click on the link (http://nova.astrometry.net/signin/).

3. Select an existing account with which you would like to log in to astrometry.net.
4. After logging in, select “My Profile” on the dashboard. There you will find a line “my API key: xxxxxx” under Account Info. Copy this APIKey and paste it into the still open Options window of the ObjectMarker.

5. After this one-time step, ObjectMarker is ready for PlateSolve.
1. Click on the ObjectMarker button in the CCD_Guide.exe to open the ObjectMarker.
2. Click on the File button in the ObjectMarker and select the image in the file selection dialogue.

3. If the image is not yet solved, the Image description window appears. Set the ObjectName or RA/DEC and then click OK.

4. Click Solve in the ObjectMarker main window.

5. If the message “A valid APIKey must be set …” appears in the info window, then first set a valid APIKey (see FAQ B02).
6. A successful solving is indicated by an info text with green background colour Click on View in the ObjectMarker so that the image is labelled now. If necessary, change the settings of the labeling (see FAQ B05).

1. Open the solved image in ObjectViewer (ObjectViewer can also be started in ObjectMarker via the View button).

2. Activate “Invoke internet search” in the Options menu and select Simbad or NED in the Search dropdown field in the function bar.

3. If necessary, change the search radius in the ObjectViewer’s options.

4. Hold left mouse button pressed for more than 1.5s over the object of interest.
5. A browser window opens with the search results.

1. The following options can be selected with the filter drop-down field:
- all: Display of all object designations
- prim.id: Display of master object designations
- second.id: Display of alias object identifiers

2. The checkboxes in the first column can be used to determine which catalogues are displayed.
3. The Min. Diameter column defines the minimum diameter of the displayed objects for each catalogue. With the uppermost input field “all” a minimum diameter can be set for all catalogues.
4. The other columns of the table can be used to set various properties of the labelling such as colours, font, etc.

In the middle of the function bar of the CCD-Guide Browser you will find a toggle button “Browse”, with which you can switch the mode of the Browser between “ImageBrowser” (default mode) and “ObjectBrowser”.
- In ImageBrowser mode you can browse through all images.

- In ObjectBrowser mode, you can browse through all objects in the database. In the ObjectBrowser you get access to the object data of all existing objects. Even objects of which there is no image at all can be queried here.

1. Open CCD-Guide Browser and set the following setting: Browse = ObjectBrowser
2. Set the object with the Objectname Filter (e.g. M 87).

3. Change the filter type to “Circular Search Radius” and set the search radius in arc minutes. Then start the filtering with the Enter button.

4. Analyse the filtered objects.
1. Click on the Expert button in the CCD_Guide.exe to open the CCD-Guide Expert.

2. Switch to the “Edit Setup” tab in the CCD-Guide Expert window.

3. If necessary, create missing cameras and telescopes in the Camera table or in the Telescope table.
4. Create the desired setups in the Setups table. For a new setup, enter a unique name and select a telescope and a camera. Entering the focal length is optional, but highly recommended as it defines the field of view.

5. To create a new planning data row for a setup, press either the “New” or “Clone” button in the Planner tab. The following mandatory fields must then be filled in:
- Select Setup from the drop-down list.
- Enter an object in the white input field to the right of the Set Object button and confirm with the Enter key.
- Select State = 0 (Image is missing).

6. Optionally, you can enter a comment, set a FOV (Field of View) image or set a reference image (see FAQ C08).
7. Click Save to save the new data row.
8. If you only want to filter the planning data rows for a specific setup, click on the button “Set Filter”, select the desired setup in the Set Filter window in the Setups table and then activate the filter by pressing the button “Set Filter”.


1. After opening the Planner tab in CCD-Guide Expert, click on the Set Filter button. This opens the Set Filter window.
2. In the Set Filter window, first set the desired setup and the state (e.g. State = 0 – Image is missing or State = 6 – Image not finished). Then restrictions are made for RA and DE. It can also make sense to restrict the object type (e.g. Planetary Nebula in a night with moonlight). Click on the button “Set Filter” to activate the filtering.

3. Use the >> ObjectTracker function in Planner to analyse the visibility of the selected object (blue data row) in detail in the ObjectTracker. Objects with the longest possible observation window are ideal. (see FAQ A08).
![]()
1. Clicking on the RATXT column header sorts the objects in the Planner by right ascension. The ascending right ascension gives a good indication of which objects can be photographed first during the night and which are more likely to be photographed later (second half of the night).

2. Use the >> ObjectTracker function in Planner to analyse the visibility of the selected object (blue data row) in detail in the ObjectTracker. Objects with the longest possible observation window are ideal. (see FAQ A08).
![]()
3. More tips for advanced users in the FAQ C01.
Level C
1. Follow tips in FAT B10 .
2. Use the State field in the Planner to document the status. Objects that have been started are set to State = 6 (Image not finished) and all exposure times that have already been collected or the frames that are still missing are documented in the Planner Comment.

3. With Set Filter you can filter for data rows with State = 6 (objects in progress) or for data rows with State = 0 (planned objects that have not yet been started). For large planning lists, further additional restrictions (such as object type or RA) can be made in the Set Filter.
4. As an alternative to the Set Filter, the QuickFilter can also be used for a priority ranking (see FAQ C04).
5. Use the Export OT button to analyse the entire filtered object list in the ObjectTracker at once. After clicking on this button, the Browse window of the ObjectTracker appears in addition to the ObjectTracker main window. In the Browse window the filtered planning objects are visible. Using the arrow keys on the keyboard, one can quickly browse through all the objects and identify the most appropriate object by analysing the ObjectTracker graph.

![]()
1. Open the Browser and set the following settings: Browse = ImageBrowser; Database = All or User.

2. Select the desired image data row (highlighted in blue color).
3. The following functions are available:
- Label image with object names with ” >> ObjectMarker” (see FAQ B03)
- Label image with object names with ” >> ObjectMarker” (see FAQ B03)
Yes, that makes absolute sense. To do this, please set the default setting “Save WCS in image file” in the Output tab of Options in ObjectMarker. With this setting, the World Coordinate System Info (WCS) is written directly into the header of the solved image.

Specifically, this means:
- First save the image as a jpg after completing the image processing.
- Then solve it with ObjectMarker
- Enter the image in Edit Picture of CCD-Guide Expert.
- After that, your solved image is permanently available in the CCD-Guide Browser and all functions of ObjectMarker and ObjectViewer do not need solving anymore.
1. First define unique keywords for the QuickFilter (e.g. NamibiaSetup1Prio1, NamibiaSetup1Prio2,…).
2. Insert the keyword (e.g. NamibiaSetup1Prio1) anywhere in the Planner Comment field for each planning record for which a specific priority is to be assigned.
3. To filter on the records with a certain keyword, first select the filter type “Quick Filter” in the Planner and then enter the keyword (e.g. NamibiaSetup1Prio1).

1. Open the Browser and set the following settings: Browse = ImageBrowser; Database = All or User.
2. Select the filter type Circular Search Radius, set the search radius in arc minutes and enter the object. Then start the filtering with the Enter button.

Example: 14 days around new moon on 2023-06-18 in Namibia / Hakos (Latitude -23.2330 / Longitude 16.3666)
1. Open CCD-Guide Browser and set the following settings: Browse = ImageBrowser; Database = All or Master.

2. Open ObjectTracker, click Edit Locations button and create new Location Hakos (see FAQ A09).
3. Select Location = Hakos and set Date to 2023-06-18.
![]()
4. Click the Browse button in ObjectTracker to open the ObjectTracker Browse window. Make the following settings in the Browse window:
- Click Select all button or restrict to certain catalogues (e.g. Gum).
- Activate filter
- Filter: Hour angle +-120min (objects culminating around the middle of the night)
- Filter: Altitude Minimum 50° / Maximum 90° (minimum height of objects)
- Min. size: 5′ (minimum size of the objects)
![]()
5. Click the CCD-Guide button in the Browse window to transfer the objects to the CCD-Guide Browser.
6. View images of potential objects in the CCD-Guide Browser.
![]()
1. Open CCD-Guide Browser and set the following settings: Browse = ObjectBrowser; Database = All or Master.

2. Open the Set Filter window by clicking on the Set Filter button.
3. Restrict the sky area either by setting Constellation or by restricting RA / DE.

4. It is important to set Object Size (e.g. Object Size > 4′), so that you do not get too many objects.
5. By pressing the button “Set Filter” the filter is activated and you get a hopefully manageable list of objects. If there are still too many objects, narrow down the list with further or stricter set filter criteria.
6. In order to better judge the attractiveness of objects, it makes sense to change from Mode = Local (default) to Mode = Web. In WebMode, information from the web about the active object data row is displayed instead of the images.


7. To add the active object (data row with blue background) to the personal planning list, use the function “>> Export to planner”. This automatically opens CCD-Guide Expert with the Planner tab. The planner is in the “New” state and the desired object is already set for this new data row. As soon as a setup and a state have been selected, the new planning data row can be saved.

1. Select the desired data row in the Planner (data row highlighted in blue).
2. Click on the button “FOV Image” to define the field of view in the FOV Image window.

3. By default, all parameters in the FOV Image window are filled meaningfully and the object is in the centre of the image. By clicking the Update button a DSS2 image of the image FOV is downloaded from sky-map.org.

4. If you are not satisfied with the FOV, you can change the image centre (represented by a red cross) with the right mouse button or the arrow keys. If necessary, the rotation can also be adjusted in the rotation input field on the left. Click on the Update button again to download an updated version.
5. As soon as you are satisfied with the FOV image, close the FOV window with the Ok button. To save the FOV image permanently in the data row, it is necessary to click the Save button.
6. If you want to assign a reference image to the data row, click on the “Ref Image” button. In a file selection dialogue you can select the desired reference image. To save the ref image permanently in the data row, the Save button must be pressed.
1. After opening the CCD-Guide Expert, switch to the “Edit Object” tab.
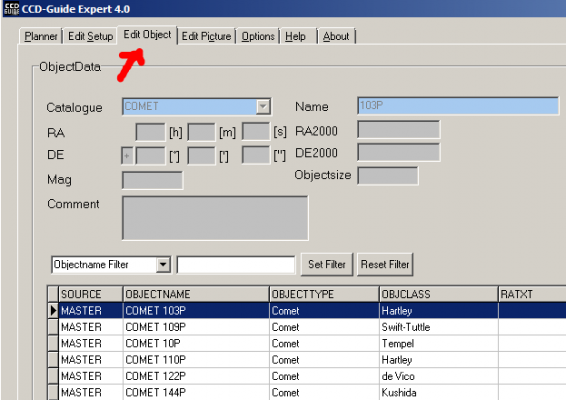
2. To create a new object, first press the button “New”. Then the following entries are made:
- Selection of “UNLISTED” in the Catalogue drop-down field
- Enter the object name
- Selection of the object type in the drop-down field
- Enter RA, DE, Objectsize and Constellation.
3. Save the new object and it will be available in all CCD-Guide and ObjectTools applications.